How to Build an 8×10 Garden Shed: DIY Guide and Materials

Building an 8×10 garden shed from scratch can be a rewarding task that not only adds value to your property but also provides a functional space for storage or a cozy backyard retreat.
However, diving into construction without a clear plan can lead to frustration, unnecessary expenses, and potential structural issues. So we will break down the process into manageable steps to ensure your garden shed project is successful and enjoyable.
Table of Contents
What is A Garden Shed?
A garden shed is just a small outdoor structure typically found in a home’s backyard, designed to store gardening tools, equipment, and supplies. It is a practical space for gardeners to organize their tools, pots, soil, fertilizers, and even outdoor furniture during the off-season.
Beyond its utilitarian purpose, a garden shed can also enhance the aesthetic look of your garden, acting as a focal point or a cozy retreat.
Benefits of Building A Garden Shed
Organized Storage Space
A garden shed provides ample space to store garden tools, feed, bedding materials, and equipment. This organized storage solution helps keep your backyard tidy and ensures that everything you need for your garden and chickens is easily accessible.
Protection from Predators
For chicken owners, a garden shed can be modified to ensure your feathered friends are safe from predators. By reinforcing the shed, you create a secure environment that protects chickens from foxes, raccoons, and other potential threats, especially at night.
Shelter from Harsh Weather
A well-constructed garden shed offers chickens protection from extreme weather conditions. Whether it’s the scorching sun, heavy rain, or cold winds, the shed can provide a comfortable refuge for your chickens, ensuring their well-being.
Enhanced Biosecurity
A garden shed can serve as a quarantine area for new birds or those that are sick, helping prevent disease spread among your flock. This separation is crucial for maintaining the health and safety of all your chickens.
Flexibility in Design
Garden sheds can be customized to meet the specific needs of your chickens. This includes installing proper ventilation, lighting, and nesting boxes to create an optimal living environment. The flexibility to design and modify a shed according to your requirements is a significant benefit.
Convenient Food and Supplies Storage
Keeping chicken feed, supplements, and care supplies in a garden shed organises these essentials and protects them from moisture, pests, and rodents. This convenience saves time and ensures that your supplies remain in good condition.
Space for Brooding Chicks
A garden shed can be easily adapted to create a warm, protected space for brooding chicks. The right setup can provide the perfect environment for young chickens to grow safely until they’re ready to join the flock.
Multipurpose Use
Beyond chicken-related uses, a garden shed can also serve as a workshop, a potting station for gardening, or even a cozy retreat. Its versatility makes it a valuable addition to any backyard.
Increases Property Value
Adding a well-designed garden shed can enhance your property’s overall appeal and functionality, potentially increasing its market value. It’s an investment that pays off in both utility and aesthetics.

Complete List of Materials in Building 8×10 Garden Shed
Shed Foundation
- Drainage Material: 25 cu. ft. of compactible gravel
- Skids: 3 pieces, 10 feet long, 4×4 treated timbers
The Shed Floor Framing
- Rim Joists: 2 pieces, 10 feet long, 2×6 pressure-treated
- Joists: 9 pieces, 8 feet long, 2×6 pressure-treated
- Joist Clip Angles: 18 pieces, 3×3 inches, 18-gauge galvanized
- Floor Sheathing: 3 sheets, 4×8 feet, 3/4 inch thick tongue-and-groove exterior-grade plywood
Shed Wall Frames
- Posts: 6 pieces, 8 feet long, 4×4 rough-sawn cedar
- Window Posts: 2 pieces, 4 feet long, 4×4 rough-sawn cedar
- Girts: 4 pieces (2 @ 10 feet, 2 @ 8 feet), 4×4 rough-sawn cedar
- Beams: 4 pieces (2 @ 10 feet, 2 @ 8 feet), 4×6 rough-sawn cedar
- Braces: 8 pieces, 2 feet long, 4×4 rough-sawn cedar
- Post Bases: 6 pieces, Simpson BC40 with nails
- Post-Beam Connectors: 8 pieces, Simpson LCE with nails
- L-Connectors: 4 pieces, Simpson A34 with nails
The Shed Roof Framing
- Rafters: 12 pieces, 7 feet long, 2×4
- Collar Ties: 1 piece, 10 feet long, 2×4
- Ridge Board: 1 piece, 10 feet long, 2×6
- Metal Anchors for Rafters: 8 pieces, Simpson H1 with nails
- Gable-End Blocking: 4 pieces, 7 feet long, 2×2
Shed Exterior Finishes
- Siding: Various lengths of 1×8 T&G V-joint rough-sawn cedar
- Corner Trim: 8 pieces, 9 feet long, 1×4 rough-sawn cedar
- Fascia and Fascia Trim: Various lengths of 1×6 and 1×2 rough-sawn cedar
- Subfascia: 2 pieces, 12 feet long, 1×4 pine
- Plywood Soffits: 1 sheet, 4×8 feet, 3/4 inch thick cedar or fir plywood
- Soffit Vents: 4 pieces, 4×12 inches, Louver with bug screen
- Flashing (Door): 4 linear feet, Galvanized—18 gauge
The Shed Roofing
- Roof Sheathing: 6 sheets, 4×8 feet, 1/2 inch thick exterior-grade plywood
- Asphalt Shingles: 1.7 squares, minimum 250# per square
- Building Paper: 140 sq. ft., 15#
- Metal Drip Edge: Various lengths, Galvanized metal
- Roof Vents (Optional): 2 units
- Roofing Cement: 1 tube
Shed Skylight
- Frame: 1 piece, 12 feet long, 2×8
- Glazing Tape: 24 linear feet
- Stops: 1 piece, 12 feet long, 1×2 clear redwood
- Glass: 1 piece, 5/16 inch tempered, clear (or optional 1/4 inch plexiglass)
- Flashing: 14 linear feet, Prefinished metal 24 gauge
The Shed Window
- Frame and Trim: Various sizes of S4S cedar and rough-sawn cedar
- Mullion: 1 piece, 4 feet long, 2×4 S4S cedar
- Glazing Tape: 44 linear feet
- Glass: 2 pieces, 1/4 inch tempered, clear
Shed Door
- Frame and Stops: Various sizes of S4S cedar
- Panel Material: 7 pieces, 7 feet long, 1×6 T&G V-joint rough-sawn cedar
- Z-Brace: Various lengths of 1×6 rough-sawn cedar
- Strap Hinges: 3
- Trim: 5 pieces, 7 feet long, 1×3 rough-sawn cedar
Fasteners and Adhesives
- A comprehensive list of nails, screws, lag screws, joist hanger nails, wood screws, galvanized roofing nails, silicone-latex caulk, and construction adhesive.
How To Build An 8×10 Shed
Building an 8×10 shed is a rewarding project that enhances your outdoor space while providing ample storage or a cozy retreat. The process involves several key steps, each requiring attention to detail and basic construction skills. Here’s how to go about it:
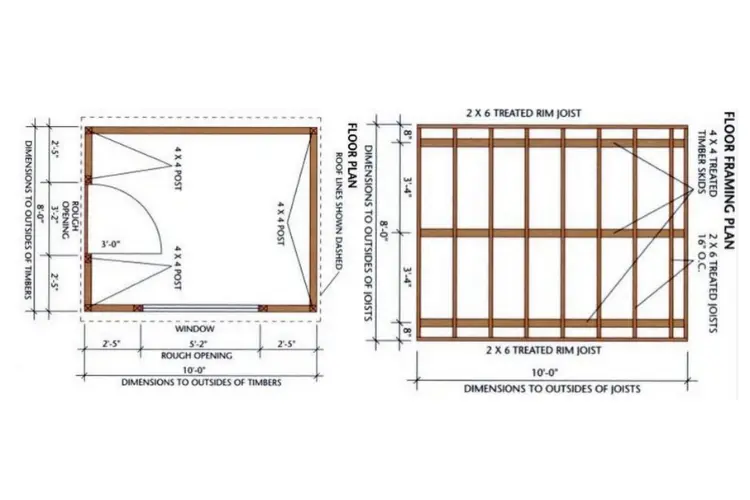
Step 1: Build the Shed Foundation & Floor Frame
First, prepare the site by excavating and laying a 4-inch layer of compactible gravel, ensuring it’s thoroughly tamped and level. Next, cut and arrange three 4×4 treated timber skids on the gravel, aligned according to your floor framing plan.
Construct the floor frame by cutting 2×6 rim joists and floor joists to length, then assemble them with galvanized nails, making sure the joists’ crowned edges face upwards for structural integrity. Place the floor frame on the skids, ensuring it’s square by measuring diagonals, and secure it using joist clip angles and toenailing techniques.
Finally, lay down tongue-and-groove floor sheathing, starting from one corner and nailing it in place every 12 inches in the field and every 6 inches along the edges.
Step 2: Cut the Posts to the Right Size and Create Slots in Them
Cut six 4×4 posts to the required height, ensuring their ends are square. The corner posts need notches on two adjacent walls or sides to fit the girts and beams, which should be marked and cut carefully. The door-frame posts require similar notching for the girt and door header.
Use a circular saw set to a precise depth to make these notches, removing the excess wood with a chisel and ensuring a snug fit for the test pieces.

Step 3: Stand the Posts and Secure Them in Place
Secure post bases to the floor, aligned with your shed’s layout. Install the posts in their bases, checking for plumb before permanently fastening them. Temporary cross-braces can help maintain the posts’ position during this process. This foundational structure is crucial for the shed’s stability and overall integrity.

Step 4: Cut the Beams and Braces and Attach Them to the Posts
Prepare the beams by cutting them to length and notching the ends for half-lap joints that will connect the structure’s corners. Assemble the beams to ensure they fit before setting them onto the posts, securing everything with nails and reinforcing the structure with metal connectors. Corner braces, cut at a 45-degree angle, are then attached to both posts and beams for additional stability.
Step 5: Install the Girts
Cut the girts to span between posts, notching the ends to fit snugly at the corners. Test-fit each girt before adhering them in place with construction adhesive and securing them with nails. This step also includes cutting and installing a door header using the same method.


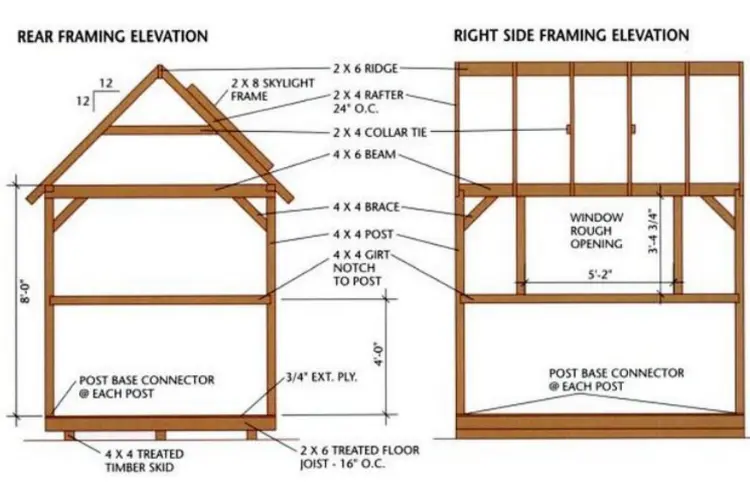
Step 6: Build the Wall Frame for the Gable Roof
Construct the roof by first cutting two pattern rafters and a ridge board. Once the rafters are cut, lay out their positions on the beams and ridge board, securing them with metal anchors. Collar ties and gable-end blocking are added for additional support and rigidity. The skylight frame is built by notching 2x8s and securing them between the rafters, prepared to house the skylight glass.

Step 7: Install the Siding on the Gable Ends
Begin siding installation at the gable ends with 1×8 tongue-and-groove boards, ensuring they’re properly aligned and secured below the floor frame’s bottom. The siding should extend up to the 2×2 blocking on the end rafters, with the boards cut flush to the door frame but not nailed to the door header.

Step 8: Add the Finishing Touches Like the Fascia and Soffits
Install the subfascia along the eaves, followed by the fascia and 1×2 trim, ensuring everything is flush and level. Soffit panels are then cut to fit and secured, with vents installed in designated areas. Continue with siding installation along the sidewalls, carefully avoiding the window header.

Step 9: Put the Roofing Material on Top of the Shed
Lay down plywood sheathing for the roof, starting from the lower corners and nailing it in place. Install drip edges along the eaves, cover the sheathing with building paper, and then add shingles, starting from the bottom up. Install pre-formed flashing around the skylight, ensuring all joints and nail heads are sealed with roofing cement.
Step 10: Install Any Skylights You Want
Apply glazing tape to the skylight frame, set the glass over the tape, and secure it with stops that have been cut to fit, including a beveled stop at the bottom for water runoff.

Step 11: Build & Install the Window
Construct a window frame slightly smaller than the rough opening and secure it with screws. Install it using shims to ensure it’s level and plumb, then fasten it in place. Cut and install the glass, securing it with stops and glazing tape.

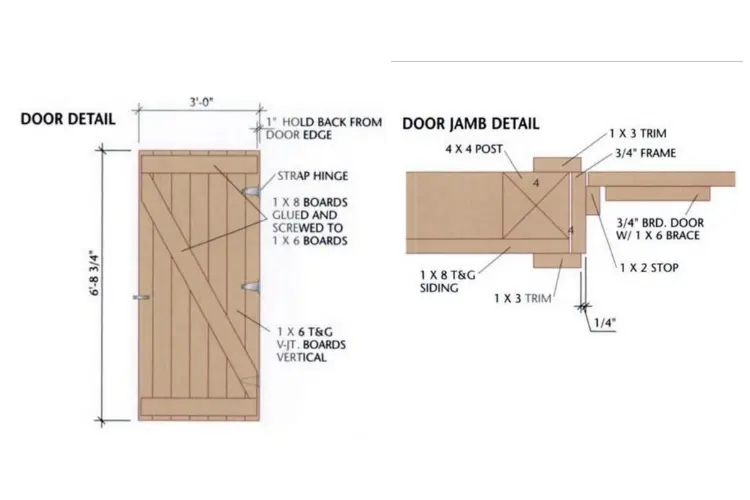
Step 12: Build the Door and Add Any Final Trim
Create the door opening frame and attach panel material with a Z-brace for added strength. Hang the door using strap hinges. Finally, install all necessary trim around the door, window, and corners for a finished look.
Each step in building an 8×10 garden shed is crucial for creating a sturdy and functional structure. Following these instructions carefully ensures that your shed will be a sturdy and valuable addition to your outdoor space.
Read also: Is It Cheaper to Build Your Own Shed or Buy Pre-built in 2024
Final Thoughts
Building an 8×10 garden shed is no small feat, but with careful planning, the right materials, and a bit of elbow grease, it’s an achievable project that can enhance your outdoor living space. This DIY guide provides a solid foundation for your construction journey, but remember, every project is unique.
Feel free to adjust the 8×10 shed plans to suit your needs, and most importantly, take pride in creating something with your own two hands. Your storage shed will serve as a testament to your DIY skills and a valuable and versatile addition to your home.
Ready to roll up your sleeves and build your own shed? Let our shed plans guide you through the process.