Step-by-Step Guide to Building Your Own Lean-to-Tool Shed

Are you a chicken farmer struggling with the challenge of keeping your coop supplies organized and accessible? Do you find yourself constantly searching for a place to store feed, tools, and equipment, only to end up with cluttered spaces and wasted time?
Managing a successful chicken farm requires efficient storage to maintain a clean and organized environment. However, finding the right storage options can be a daunting task.
So, in this step-by-step guide tailored for chicken farmers, we’ll take you through the process of building your own lean-to-tool shed, providing you with the extra space and organization you need to streamline your farm operations.
Table of Contents
Why Do You Need A Lean-to-Tool Shed as a Poultry Farmer
As a poultry farmer, having a lean-to-tool shed can streamline your farming operations and enhance the efficiency of your farm.
Storage Solutions
A lean-to-tool shed provides ample space to store your farming tools and equipment. This includes everything from feeders, waterers, and bedding materials to maintenance tools and personal protective equipment. Storing these items in a designated shed keeps them organized, protected from the elements, and readily accessible when needed.
Feed and Supplement Storage
Keeping feed, supplements, and medications in a dry, secure place is crucial to maintain their quality and effectiveness. A lean-to-shed can offer a perfect environment to store these items away from rodents and pests that could potentially contaminate them.
Biosecurity
Having a dedicated space for tools and equipment minimizes the risk of spreading diseases within your flock. Tools can be cleaned and disinfected in the shed, reducing the chance of introducing pathogens into the poultry living areas.
Space Efficiency
The lean-to design is space-efficient, as it can be built adjacent to existing structures like barns or poultry houses. This not only saves space on your property but also provides convenient access to tools and supplies close to where they are most needed.
Protection from Weather
Tools and equipment used in poultry farming can be sensitive to weather conditions. Storing them in a shed protects them from rain, sun, and extreme temperatures, prolonging their lifespan and ensuring they are in good working condition when you need them.
Work Area
A lean-to-shed can also serve as a workspace for tasks such as equipment maintenance, egg cleaning, or assembling new tools. This dedicated work area helps keep the main poultry areas clean and reduces disruptions to the birds.
Enhanced Organization
Implementing an organized storage system within your shed can save you time and reduce frustration. Labeling shelves and having designated areas for different categories of tools and supplies make it easier to find what you need quickly.
Safety
Keeping tools and hazardous materials securely stored in a shed reduces the risk of accidents or injuries on the farm. It also keeps potentially dangerous items out of reach of children and animals.
So don’t settle for a standard shed. Build one that suits your style and needs! Get started with our shed plans.

Read also: How to Build a Chicken Coop from a Shed in 2023
Complete List of Materials in Building Lean-to-Tool Shed
Foundation of the Lean-to-Tool Shed
- Drainage material: 0.5 cu. yd. of compactible gravel
- Skids: 2 pieces of 4 × 4 treated timbers at 6′-0″ each
Lean-to-Tool Shed Floor Framing
- Rim joists: 2 pieces of 2 × 6 pressure-treated wood at 6′-0″ each
- Joists: 3 pieces of 2 × 6 pressure-treated wood at 8′-0″ each
- Joist clip angles: 4 pieces of 3 × 3 × 3″ × 16-gauge galvanized metal
- Floor sheathing: 1 sheet of 3/4″ tongue-&-groove exterior-grade plywood at 4 × 8′
Lean-to-Tool Shed Wall Framing
- Bottom plates: 1 piece at 8′-0″ and 2 pieces at 6′-0″ of 2 × 4 wood
- Top plates: 1 piece at 8′-0″ and 3 pieces at 6′-0″ of 2 × 4 wood
- Studs: 14 pieces at 8′-0″ and 8 pieces at 6′-0″ of 2 × 4 wood
- Header: 2 pieces at 6′-0″ of 2 × 6 wood
- Header spacer: 1 piece of 1/2” plywood at 6′-0″ wide
Roof Framing of Lean-to-Tool Shed
- Rafters: 6 pieces at 6′-0” of 2 × 6 wood
- Ledger: 1 piece at 6′-0” of 2 × 6 wood
Exterior Finishes
- Plywood siding: 4 sheets of 5/8 texture 1-11 plywood siding at 4 × 8′ with grooves at 8″ O.C.
- Door trim: 2 pieces at 8′-0″ and 2 pieces at 6′-0″ of 1 × 10 and 1 × 8 S4S cedar wood, respectively
- Corner trim: 6 pieces at 8′-0″ of 1 × 4 S4S cedar wood
- Fascia: 3 pieces at 6′-0” and 1 piece at 6′-0” of 1 × 8 and 1 × 4 S4S cedar wood, respectively
- Bug screen: 8 pieces at 6′-0” of fiberglass material
Lean-to-Tool Shed Roofing
- Roof sheathing: 2 sheets of 1/2″ exterior-grade plywood at 4 × 8′
- Shingles: Sufficient for 30 sq. ft., with a minimum weight of 250# per square
- Roofing starter strip: 7 linear ft.
- 15# building paper: 30 sq. ft.
- Metal drip edge: 24 linear ft. of galvanized metal
- Roofing cement: 1 tube
Lean-to-Tool Shed Door
- Frame: 1 piece of 3/4″ × 3 1/2″ (actual) cedar wood at 3″ × 6′-0″
- Stops: 3 pieces at 6′-0″ of 1 × 2 S4S cedar wood
- Panel material: 12 pieces at 6′-0″ of 1 × 6 T&G V-joint AS cedar wood
- Z-brace: 2 pieces at 10′-0″ of 1 × 6 S4S cedar wood
- Construction adhesive: 1 tube
Interior Trim (optional)
- 3 pieces at 6′-0″ of 1 × 3 S4S cedar wood
Strap Hinges (with screws)
- 6 hinges
Fasteners
- Various nails and screws, including galvanized common nails, galvanized casing nails, galvanized finish nails, box nails, joist hanger nails, roofing nails, deck screws, and wood screws, in various quantities ranging from 12 nails to 60 screws.
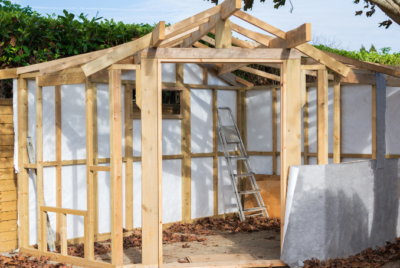
How To Build A Lean-to-Tool Shed
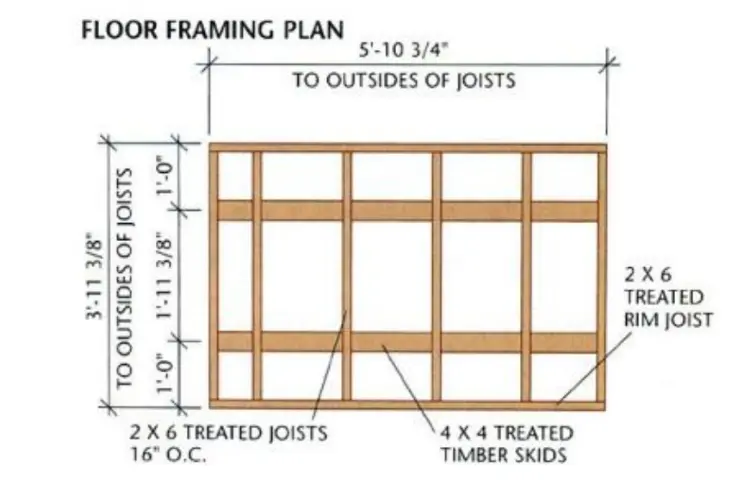
Step 1: Start Building the Shed Foundation & Floor Frame
The first step in building your lean-to tool shed is to create a solid foundation and floor frame. Begin by excavating the building site and adding a 4-inch layer of compactible gravel. Tamp the gravel thoroughly to ensure it is flat and level.
Next, cut two 4×4 treated timber skids to 70 3/4 inches and arrange them on the gravel bed according to the floor framing plan. Cut two 2×6 rim joists and six joists to the appropriate lengths and mark the joist layout onto the rim joists.
Assemble the frame using 16D galvanized common nails, inspect each joist for crowning and install it with the crowned edge up. Set the shed floor frame on top of the skids and measure the diagonals to ensure it’s square. Toenail the joists to the skids and install metal clip angles where the outer joists meet the skids.
Finally, cut the plywood floor sheathing to size and install it with galvanized box nails, checking the squareness of the frame as you go.


Step 2: Frame the Lean-to-Tool Shed Walls
With the foundation and floor frame in place, it’s time to frame the walls of your shed. Start by snapping chalk lines on the floor for the wall plates and cutting the bottom plates to size. Cut the necessary studs and plates according to the floor plan and assemble the walls, leaving off the top plates for now.
Then nail the end studs of each side wall to the bottom plate, raise the shed walls, and then fasten the bottom plates to the shed floor. Install the rear top plates, ensuring they span between the side-wall studs, and the single top plate on the front wall, ensuring the door opening is square
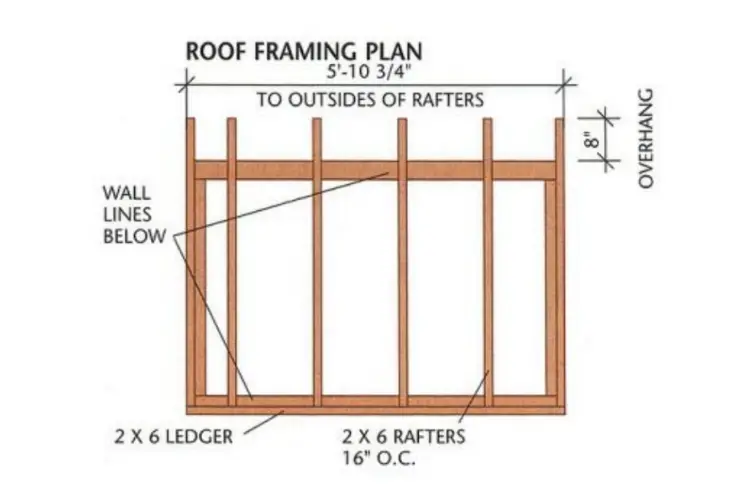
Step 3: Frame the Roofs of Your Lean-to-Tool Shed
The next step is to frame the roofs of your shed. Cut the rafters according to the provided template and rip the ledger down to the appropriate width. Position the ledger on the rear wall and toenail it to the wall plates, then install the rafters, toenailing them to the wall plates and end nailing them to the ledger.
Transfer the layout by marking the rafter layout onto the ledger and wall plates, ensuring accurate placement.
Step 4: Complete the Side Wall Framing
Once the main structure of the shed is in place, complete the side wall framing by installing the top plates and transferring the stud layout marks from the bottom plates to the top plates. Cut the remaining studs to fit between the plates, angling the top ends as necessary, and toenail them to the plates.

Step 5: Install the Siding & Fascia
With the walls and roofs framed, it’s time to install the siding and fascia. Begin by installing plywood siding on the side and rear walls, ensuring proper alignment and nailing. Cut and install the fascia along the rafter ends, holding the boards above the top edges of the rafters to account for the thickness of the roof sheathing.

Step 6: Install the Sheathing & Roofing
Next, install the plywood sheathing perpendicular to the rafters and attach metal drip edge along the roof edges. Apply building paper over the sheathing and add drip edge along the remaining edges. Finally, install the asphalt shingles, starting at the front edge of the roof and finishing along the top edge with custom-cut shingles or a continuous roofing strip.

Step 7: Build & Install the Doors
Now it’s time to build and install the doors for your shed. Cut out the bottom plate from the door opening and construct the door frame using cedar. Install the frame in the rough opening, ensuring it is square and plumb, and then assemble the door using tongue-and-siding boards and Z-brace boards. Install the hinges and hang the door, making sure it operates smoothly.


Step 8: Add the Trim
To finish off your lean-to tool shed, add the trim to the doors and around the edges of the shed. Staple fiberglass bug screen to the front wall plate and roof sheathing to block each rafter bay. Cut and install the trim above the door, overlapping the side door jambs, and install the vertical door trim boards to cover the corner trim.
Finally, install the horizontal bottom door trim board and the corner trim to complete the look of your shed.
Whether you’re a seasoned DIY enthusiast or a beginner, constructing your own shed can be a satisfying and rewarding project that adds value to your home.
What Are the Factors to Consider When Building a Lean-to-Tool Shed?
Location and Placement
Building the lean-to-tool shed as an attachment to another structure offers several advantages and considerations. By hanging the shed on an existing wall, you can save on materials and labor by eliminating the need to construct a separate back wall. This also provides additional space within the shed.
However, there may be insurance and tax implications, as attaching the shed can make it a more permanent structure, potentially affecting property taxes and insurance premiums.
Additionally, in cold climates, frost heave may pose a risk, necessitating proper foundation design to prevent damage to both structures.
Size and Design
The size and design of your lean-to tool shed should be determined based on the specific tools and equipment it will house and any additional space requirements. You should consider factors such as the number of tools, their sizes and shapes, and whether you’ll need room for future expansions or modifications.
Design the shed with a lean-to structure that maximizes available space while remaining mindful of budget constraints and construction feasibility.
Materials and Construction
Selecting the right materials and construction methods is essential for ensuring the durability and longevity of your lean-to-tool shed. Choose high-quality, weather-resistant materials such as pressure-treated lumber, metal roofing, and exterior-grade plywood. Pay close attention to insulation and ventilation to protect tools from moisture, temperature fluctuations, and pests.
Whether you opt for a DIY shed approach or hire a professional contractor, prioritize sturdy construction and attention to detail.
Foundation and Stability
Several options are available, each with its own advantages and considerations. A concrete slab foundation offers durability and stability, making it ideal for a permanent shed floor. However, it may have tax implications and requires careful planning to ensure proper drainage.
Deck blocks are inexpensive and easy to install, providing airflow under the shed to reduce moisture and rot. Skid foundations are quick and easy to build, making them convenient for relocatable sheds.
Finally, a gravel pad foundation is easy to construct but requires building a separate floor to lift the shed off the gravel and prevent moisture buildup. Consider your specific needs, budget, and site conditions when selecting the appropriate foundation for your lean-to-shed.
Accessibility and Security
Consider the accessibility and security features of your lean-to tool shed to ensure it meets your practical needs and provides peace of mind. Install doors, windows, and access ramps as needed for easy entry and exit. Additionally, consider adding locks, alarms, or other security measures to protect your tools from theft or unauthorized access.
Regulatory Compliance
Understanding local regulations is paramount when building a lean-to-shed. In many areas, permits are required for certain types of construction projects, including sheds.
For instance, according to your local regulations, you can build two sheds of less than 144 square feet each on your property without a permit.
However, attaching the lean-to-shed to an existing structure may necessitate a permit, especially if it affects the structural integrity or footprint of the building. Consulting with your local building department can provide invaluable guidance and assistance in navigating these regulations.
Read also: Is It Cheaper to Build Your Own Shed or Buy Pre-built in 2024
Feeling inspired to build your own shed? Find the perfect design in our selection of shed plan
Conclusion
Building your own lean-to-tool shed is a rewarding endeavor for chicken farmers seeking to enhance their farm operations. By implementing this step-by-step guide, you can create a functional and organized space to store feed, tools, and equipment, ultimately streamlining your daily tasks and improving productivity.
With a well-designed shed in place, you’ll be better equipped to meet the needs of your flock and efficiently manage your farm. Embrace the opportunity to take control of your farm’s organization and storage solutions, and watch as your operations thrive in a clutter-free environment.
Here’s to happy chickens, successful farming, and the satisfaction of a job well done.